Frequently Asked Questions
What's the difference between DrumKick Universal & DrumKick for iPhone?
DrumKick Universal and DrumKick for iPhone's sounds and features are identical. The only difference, is, DrumKick Universal contains high-resolution (Retina) graphics that are optimized for the iPad and iPhone. DrumKick for iPhone only contains the graphics for iPhone resolution. Since DrumKick Universal contains more images for the iPad and iPhone, its file size is 50.9MB, while DrumKick for iPhone is 20.9MB.
How do I play the kick drum with my foot?
DrumKick can be installed on multiple iOS devices. The ideal configuration would be to use an iPad to play the drum kit with your fingers, while using an iPhone or an iPod touch to trigger the kick drum sound with your foot. It also works well with paired iPhones and iPod touches.
Setup with an iPad and an iPhone/iPod touch:
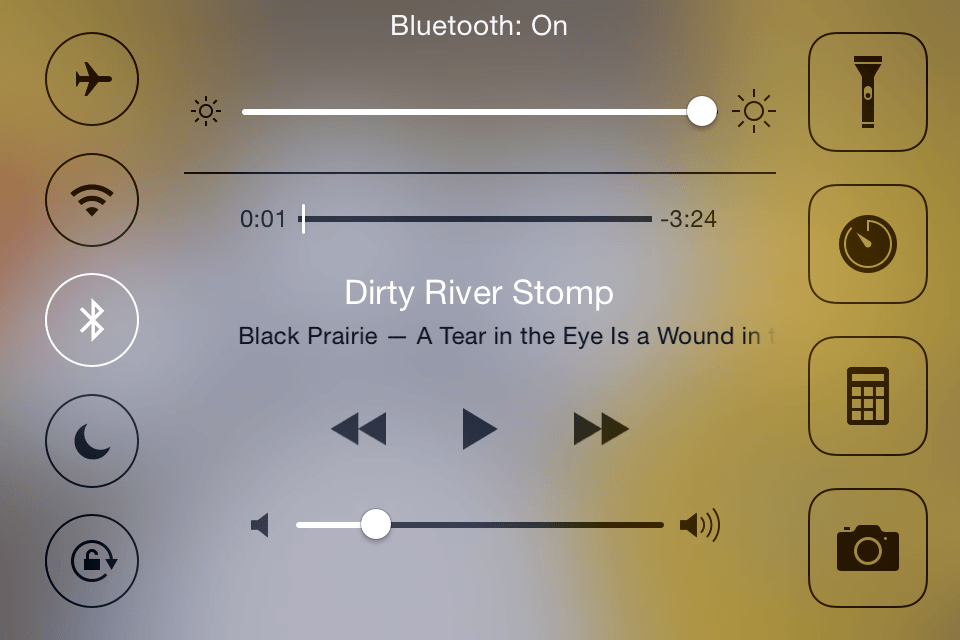
- Enable Bluetooth, if it isn't on already. You can quickly do this by swiping up from the bottom of your device's screen to display the iOS Control Panel options. Then, tap on the Bluetooth icon.
- Install and launch DrumKick on both devices.
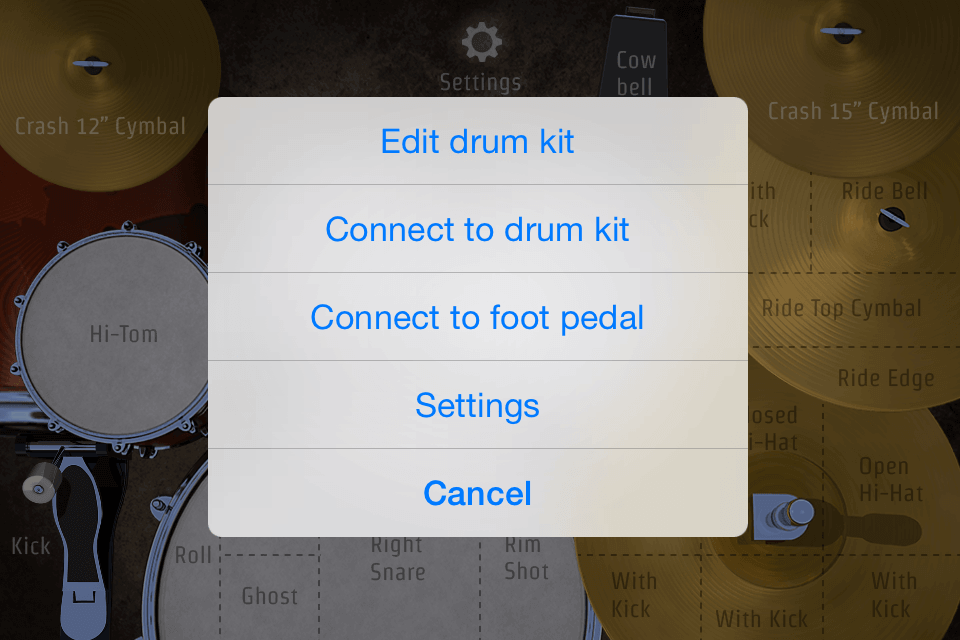
- Tap on the settings gear icon
 at the top of the drum kit.
 - On the iPad, tap "Connect to foot pedal" in the alert menu.
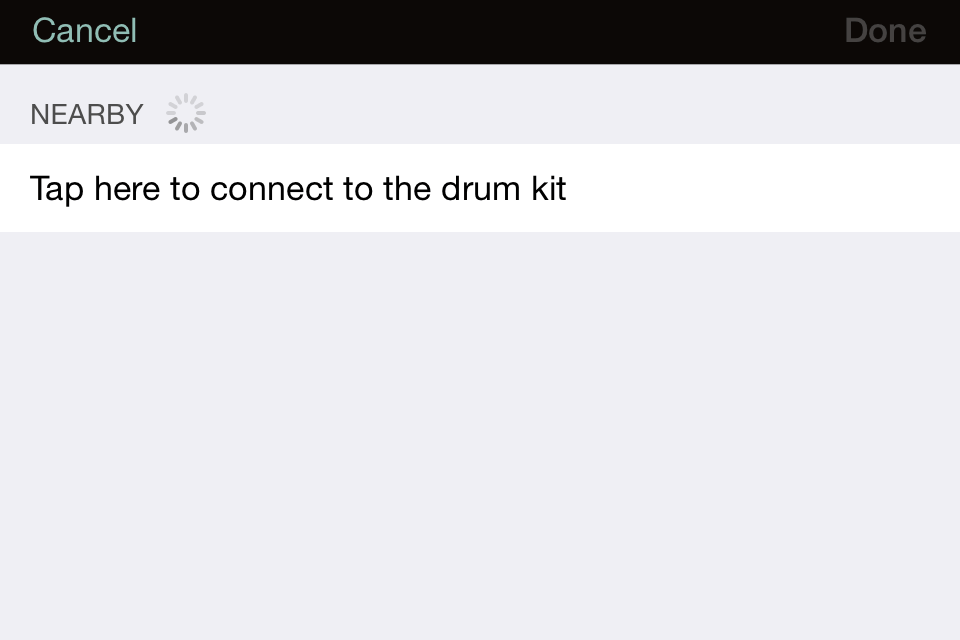
- On the iPhone/iPod touch, tap "Connect to drum kit" in the alert menu. A modal screen will appear, indicating that your iPhone/iPod touch, AKA, the foot pedal, is searching for a nearby Bluetooth iPad or iPhone/iPod touch to act as the drum kit.
- Once it discovers your iDevice, a button will appear that says, "Tap here to connect to the drum kit." Go ahead and tap it. :)
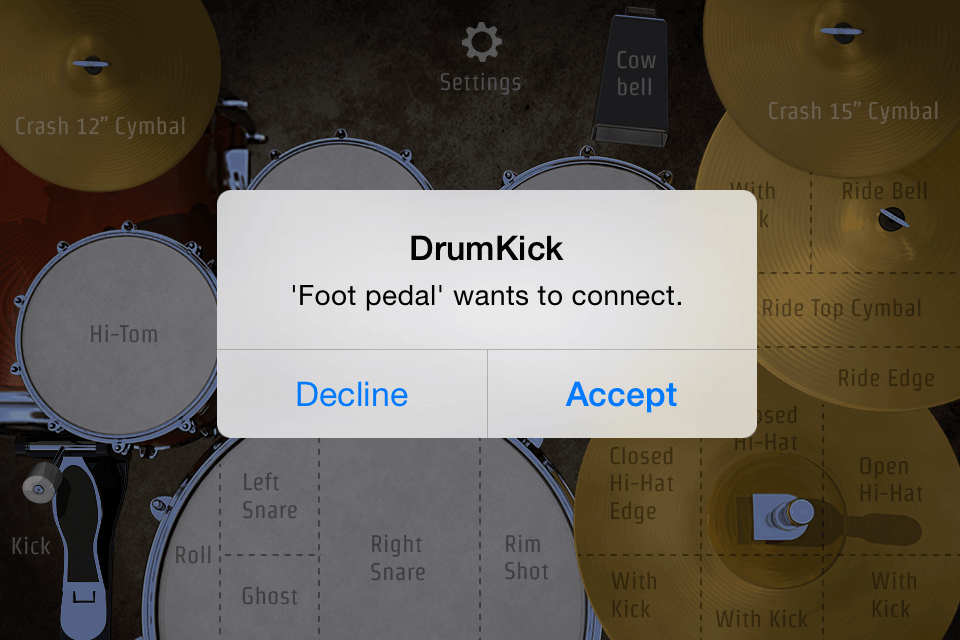
- After you tap the button, an alert on the iPad will say, "'Foot pedal' wants to connect." Tap "Accept" to allow the connection.
- As soon as the iPad discovers the foot pedal (iPhone/iPod touch), a modal screen with an arrow pointing to the top of the iPhone/iPod touch will appear on your screen, and the iPad will confirm a successful connection.
- In order to test the Bluetooth connection, go ahead and flick (don't throw) the top of your iPhone forward in your hand, so that it triggers the kick drum on the iPad.
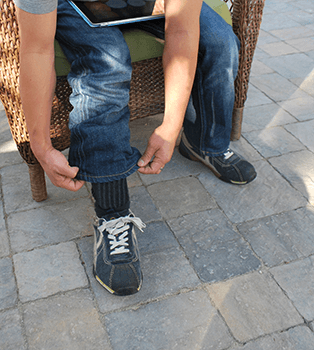
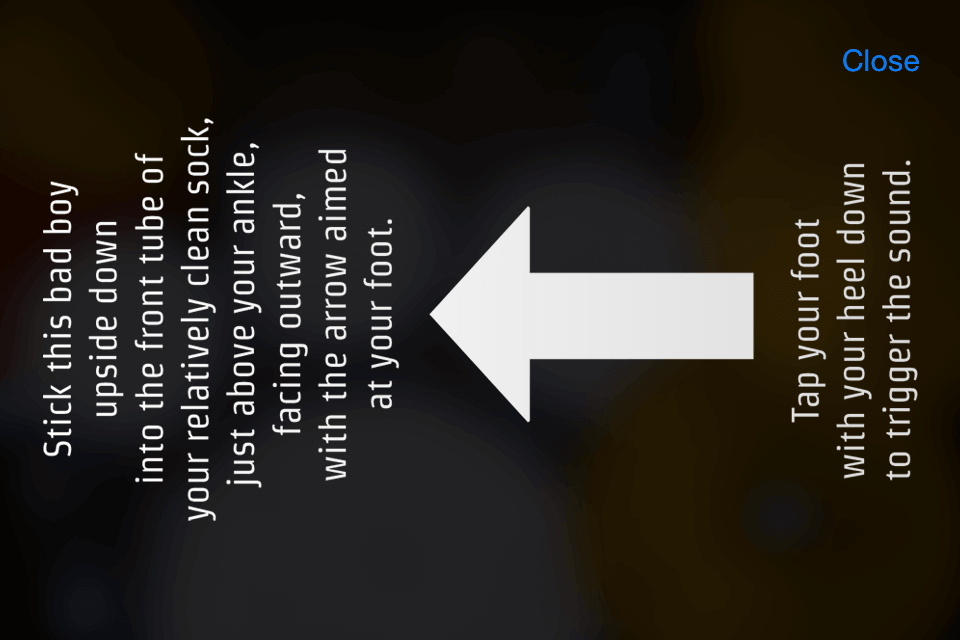
- If the kick drum plays on the iPad, you're ready to stick the iPhone/iPod touch upside down into the front tube of your relatively clean sock. The device should rest on the top of your foot, facing outward. A thick crew-style sock and shoe are recommended for accuracy. You may also use a fitness band, if you'd rather not put your device in your sock.
- Sit on a comfortable chair, and place your foot on the floor with your lower leg resting at an 80 degree angle.
- Tap your foot with your heel down.


- The other option to trigger the remote kick drum, is to select the option to tap the iDevice with your bare foot. Try to use your toes, rather than the ball of your foot. You'll get more accuracy that way. Yes, this method is not very sanitary, I know. But, the playability is pretty awesome, and you won't have to worry about the iDevice slipping within your sock!
I also recommend adhering painter's or masking tape to the backside of your iDevice in order to keep it from getting pushed away from you.
How do I set up DrumKick to be played via the iRig BlueBoard foot pedal?
If you have IK Multimedia's iRig BlueBoard, you can play any of DrumKick's sounds via MIDI program changes.
Set up the iRig BlueBoard:
- Enable Bluetooth, if it isn't on already. You can quickly do this by swiping up from the bottom of your device's screen to display the iOS Control Panel options. Then, tap on the Bluetooth icon.
- I recommend turning on Airplane mode, and then enable Bluetooth. That way, your iDevice won't receive calls or notifications during your performance. But, if you'd rather not enable Airplane mode, you can simply enable Bluetooth by itself.
- On your iDevice, launch the iRig BlueBoard app that's required to connect to the BlueBoard foot controller. You can download the free BlueBoard app from here.
- You should notice in the center that the BlueBoard says, "Tap here to connect." Tap the text, and select the iRig BlueBoard in the device list.
- Turn the iRig BlueBoard controller to see its underside. Flip the power switch from "Off" to "On." Once this is done, you will see a flashing blue indicator light on the top of the pedal. The flashing indicates that the BlueBoard's Bluetooth is looking for another Bluetooth-enabled device to connect to.
- Once it discovers your iDevice, the blue light on the BlueBoard pedal board will stop flashing. That means that the Bluetooth connection was successfully made between the BlueBoard and the iDevice.
- Place the iRig BlueBoard controller back on the floor, so that you can step on the pedal switches A through D to test the connection with your iDevice. The corresponding pedal presses will light up upon button press, which you can verify in the BlueBoard app.
- One limitation about the BlueBoard (due to only having 4 pedals), is that if you select the ability to press and hold the up and down buttons to make bank changes, the program change will be sent upon release of the pedal switch. That will not work well with DrumKick, because we want the sound to trigger upon press down, not release.
- In order to change the button press from release, to press, we have to turn off "Allow Bank Change." This is accessed within the BlueBoard app by tapping the top-right Menu button > Settings. When you've turned off "Allow Bank Settings," you can tap the "Close" button to return to the BlueBoard main interface view. Just be sure to keep the BlueBoard app open in the background, or else the Bluetooth connection between the iDevice and the BlueBoard foot controller will disconnect.
- For the next step (no pun, intended), please return to the DrumKick app (double-tap the Home button to multi-task), and go to the MIDI settings by tapping the following from the drum kit screen: Gear icon > Settings > MIDI Setup.
- Scroll to the bottom of the MIDI Setup page and tap the BlueBoard device name under "MIDI Interfaces." You should see a checkmark appear on the right side to indicate that its MIDI connection is established.
- Scroll up to "Received Program Changes" in the MIDI IN section and tap that row to display the assigned program changes that will be received by the iRig BlueBoard foot controller. The first 4 program changes are enabled by default. They are: Preset Down (A), Preset Up (B), Snare (C), and Kick (D). You can tap on the buttons on the iRig BlueBoard and hear the sounds coming from DrumKick.
- If you would like to change the instrument for each program change, you can do so by enabling the instrument name that you'd like to trigger, and tapping its row to select the program change number. You can even have multiple instruments be triggered by the same program change number for layered effects.
- While you tap away on the pedal buttons on your iRig BlueBoard foot controller, I highly recommend adhering painter's or masking tape to the underside of the pedal board in order to keep it from getting pushed away from you with each tap of your foot. Have fun!
What's the best way to play DrumKick live?
If you're performing with house speakers, I recommend that you get a stereo 3.5mm headphone splitter to connect to your iOS device's headphone jack. This will allow you to use one of the outputs to send to the mixer or external speakers and the other for your headphones. This will allow you to listen to your drum playing clearly, so that you won't have to depend on reference monitors in a noisy environment. After all, it's extremely difficult to hold a solid drum beat, if you can't hear yourself play!
Be sure to switch the stereo audio output to mono on the iOS device whose output will be sent to the external speakers. That way, DrumKick's sounds won't get stereo-panned in the house speakers. This can be located in DrumKick's Settings menu.
If you want to be completely safe, restart your iOS device and make sure that its battery is fully charged. Otherwise, you can always plug it into a power outlet, during your performance.
Turn on Airplane Mode in your iOS device's Settings app. This will allow you to play without potentially receiving phone calls, texts, or any other notification alerts during the show.
If you plan to utilize DrumKick's remote kick drum feature while in Airplane Mode, please turn Airplane Mode on first, and then enable Bluetooth in the iOS device's Settings menu to allow the pairing between each device. This is important, because Airplane Mode will immediately turn off Bluetooth.
Back to top
What is a cymbal choke?
A cymbal choke is when a drummer strikes the cymbal and holds its edge immediately, causing the cymbal's sustain to stop. In order to achieve this effect, simply touch a cymbal and hold it. You can turn this option off in the Settings menu, if you never intend to use it.
Back to top
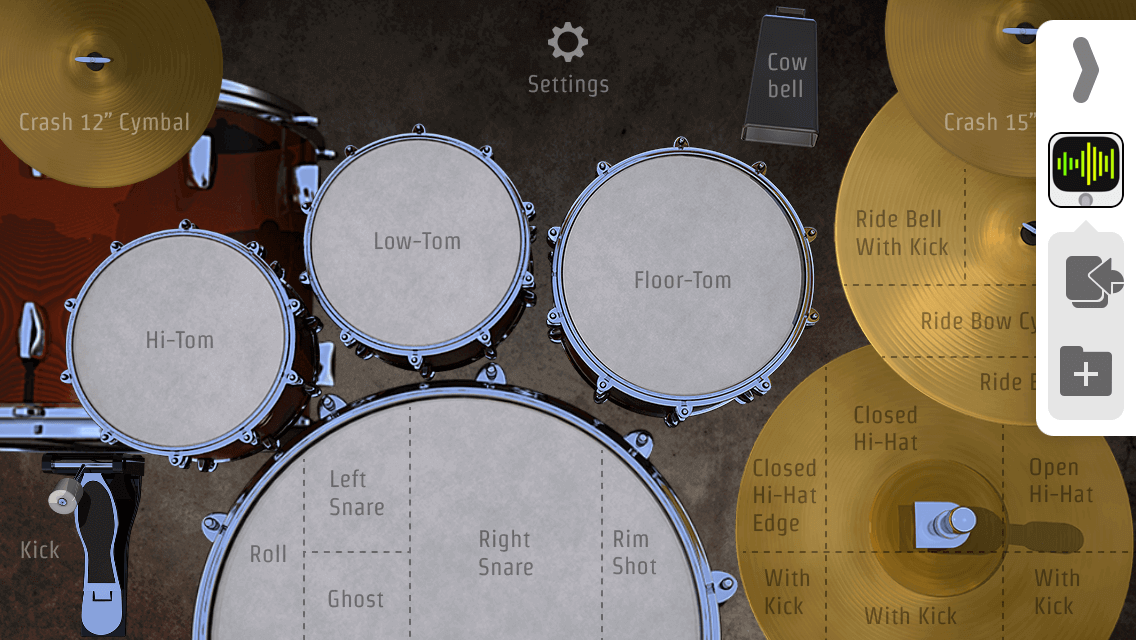
How do I edit the drum and cymbal sounds?
From the drum kit view, tap on the gear icon, which will launch an alert box that will display options to "Edit Drums" or access the "Settings" menu. Tap on the "Edit Drums" button and then tap on the drum item that you wish to modify. From there, you will be able to change its volume level, pitch, and stereo panning.
Back to top
What is Audiobus?
Audiobus is a third-party inter-app audio routing system that takes the audio signal of an Audiobus-compatible synth or generator app such as DrumKick, and provides the ability to add a wide variety of effects and record its output. You can download the Audiobus app here.
Back to top
How do I route DrumKick's audio to Audiobus-enabled apps?
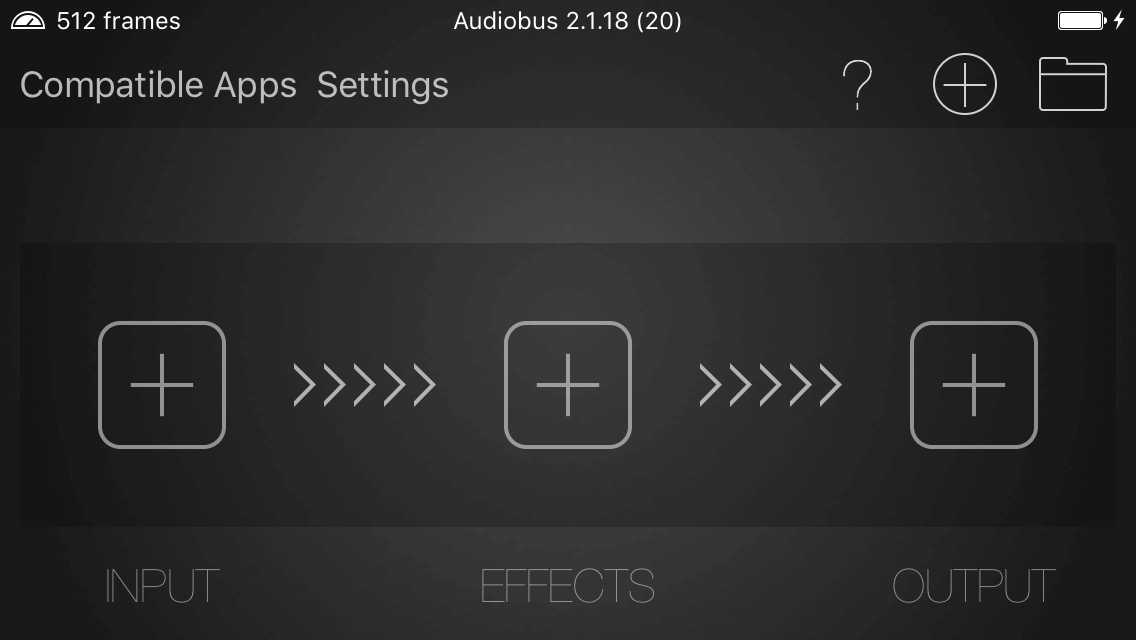
- Launch the Audiobus app.
- Tap the '+' icon in the INPUT slot.
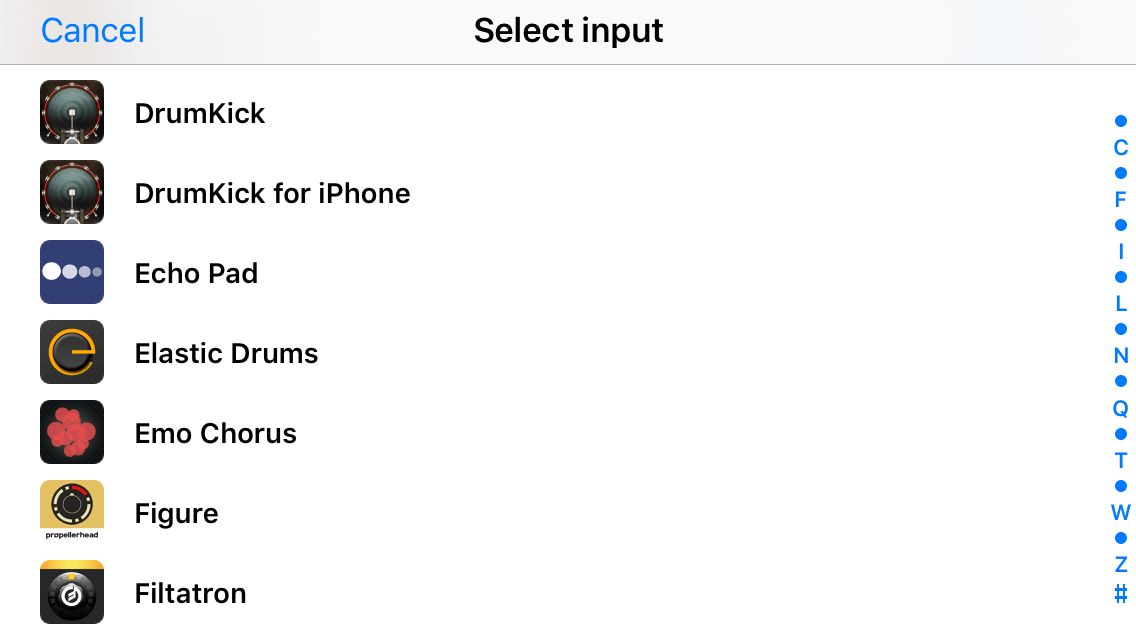
- Scroll down the list of compatible input apps, and tap the DrumKick icon.
- The '+' icon will be replaced with a sleeping DrumKick icon. Tap the DrumKick icon, so that it's launched within the Audiobus app.
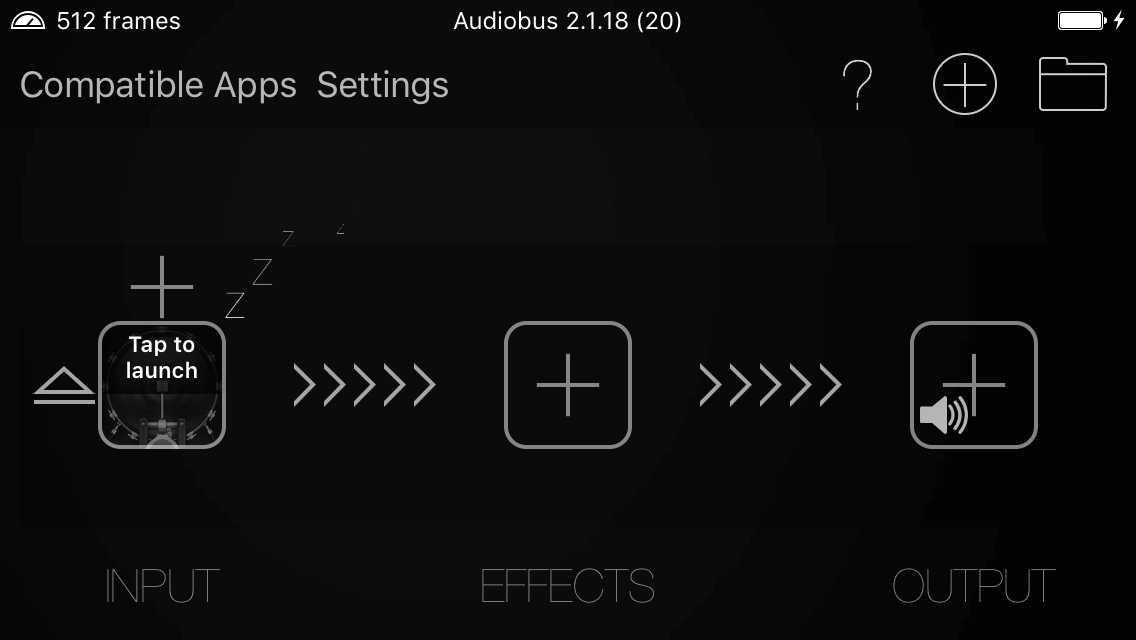
- After DrumKick completes loading, you'll see the Audiobus control panel at the right side of the screen. You can swipe the control panel off of the screen by flicking your finger to the right, so that it doesn't obstruct DrumKick's interface. But, if you'd like to show Audiobus' control panel again, simply flick your finger to the left, from off of the iDevice's right-side screen.
- Once DrumKick appears in the INPUT slot, you can tap the '+' icon in the EFFECTS slot to add a reverb, delay, distortion, flanger, or other effect app that you have on your iOS device. Some effects apps provide the ability to record your audio output with the applied effects. But, if you need a dedicated app to record the audio output from your Audiobus chain, simply tap on the '+' in Audiobus' OUTPUT slot, and select the app with a recording feature.

What is Audiobus Remote?
Audiobus Remote is a companion app that connects to the Audiobus app, via Bluetooth LE (Low Energy). With a secondary iOS device, Audiobus Remote provides a secondary screen with triggers for your Audiobus-enabled apps, so that you can modify their parameters or toggle specific functionality, without needing to switch to their own interface to access them. Please note, that the trigger will only appear in Audiobus-enabled apps that provide them.
You can download the Audiobus Remote app here.
Back to top
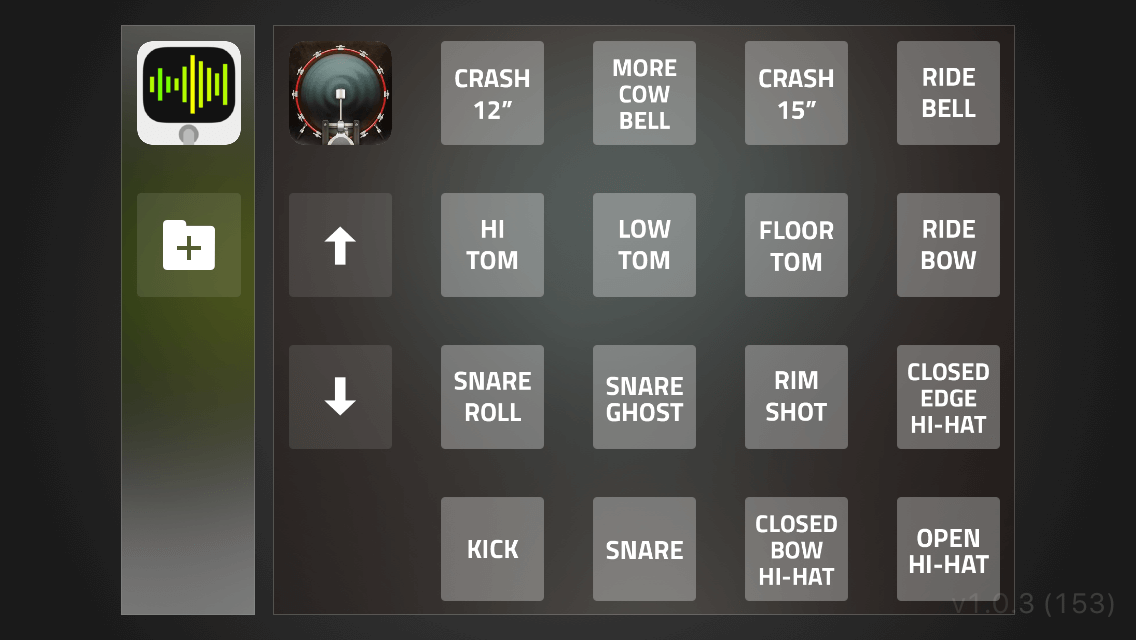
How do I trigger DrumKick using Audiobus Remote?
- Enable Bluetooth, if it isn't on already. You can quickly do this by swiping up from the bottom of your device's screen to display the iOS Control Panel options. Then, tap on the Bluetooth icon.
- Follow the previous step to launch Audiobus and insert the desired input, effects, and output devices on your main device. Please be sure that the Audiobus app is displayed in the foreground. Otherwise, the Audiobus Remote app on the second iDevice won't be able to connect to it via Bluetooth.
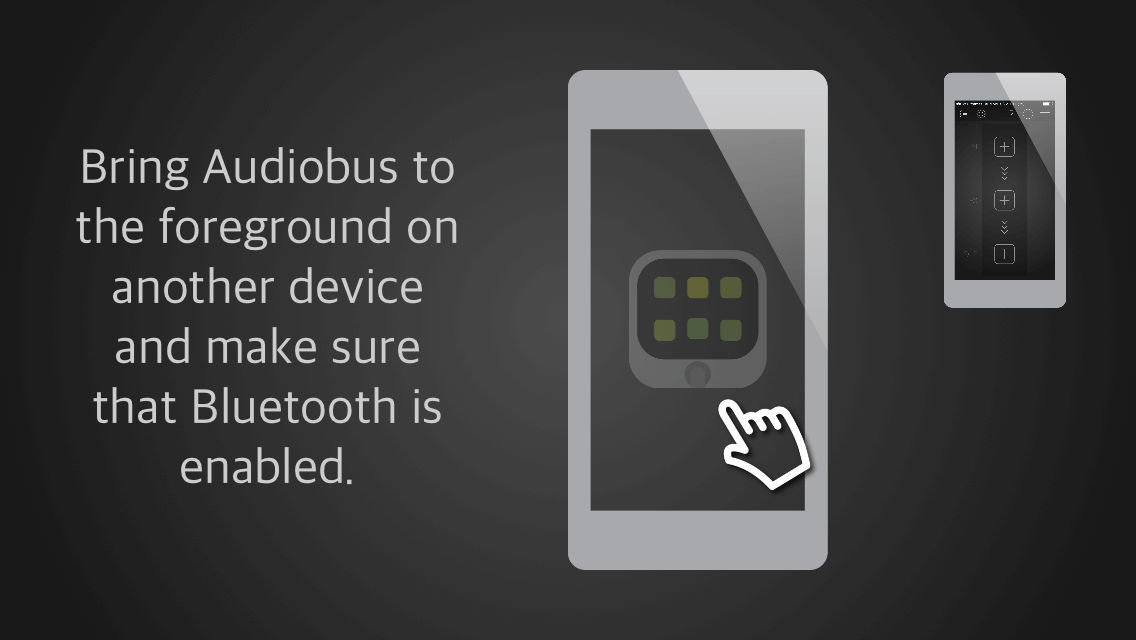
- On the second iDevice, launch the Audiobus Remote app. After a few seconds, you should be able to see the apps that are connected to Audiobus on the main iOS device, along with their remote triggers.
What is Inter-App Audio (IAA)?
Inter-App Audio, also known as IAA, is Apple's audio routing system that takes the audio signal of another IAA-compatible synth or generator app such as DrumKick, and provides the ability to add a wide variety of effects and record its output.
Back to top
How do I route DrumKick's audio to Inter-App Audio-enabled apps?
- Launch the IAA host app.
- Select DrumKick from the list of compatible apps.
- Tap on the DrumKick icon to make the inter-app audio connection.
- Double-tap the home button to switch back to your IAA host app, press the record icon.
What is MIDI?
MIDI stands for Musical Instrument Digital Interface. It is a technology that allows hardware devices and virtual instruments to communicate and synchronize with one another.
Back to top
How do I play DrumKick from an external controller or iOS app via MIDI IN?
- If you have a MIDI keyboard controller that isn't USB-powered, you'll need a MIDI-to-USB connector, such as an iRig MIDI or an iConnectMIDI4. Otherwise, you can skip to step #5.
- Turn the MIDI keyboard controller on, if it doesn't power on automatically.
- Connect the keyboard controller's MIDI OUT port to the MIDI-to-USB connector's MIDI IN port, using a standard 5-pin MIDI cable.
- Connect the cable from your MIDI connector to Lightning or 30-pin input/power jack that's located at the bottom side of your iPhone or iPad. This completes the MIDI to USB connection.
- On your iOS device, launch the fantabulous DrumKick app.
- Tap on the Settings icon gear at the top, center of the drum kit screen, and navigate to Settings > MIDI Setup menu.
- Set the MIDI channel to match the MIDI channel on the keyboard controller. For example, if your keyboard controller or iOS app has their MIDI channel set to 10, you should set DrumKick's MIDI channel to 10. DrumKick's default is set to channel 1, but it can be set on any channel from 1-16, or none.
- Scroll down to the MIDI Interfaces list, and select the desired device or app to enable it. This will allow you to receive MIDI data into DrumKick.
- Now, play the keys or pads on your MIDI controller or iOS app. You should hear DrumKick's drum sounds, as well as see its drums shake and animate with each trigger.
- If you're playing or sequencing DrumKick from an iOS MIDI app, be sure to select 'Enable Background Audio' in DrumKick's Settings > MIDI Setup menu. Otherwise, you won't be able to hear DrumKick's audio output playing in the background.
- DrumKick's MIDI note number input map is based on the General MIDI drum map. You can quickly transpose its input note numbers above and below 5 octaves from middle C, and re-assign each instrument to play on any note number between 0-127. You can always reset it back to the default MIDI IN drum map.
- More often than not, iOS drum apps don't completely adhere to the General MIDI drum map. If that's the case, you can tap on 'Input Note Map,' and select a new MIDI IN note number for the desired instrument.
Playing DrumKick from an external keyboard controller or drum pad
Playing DrumKick from another MIDI-enabled app
DrumKick's MIDI IN Note Map:
| Instrument | Note Number | Note Name |
|---|---|---|
| Kick | 36 | C |
| Cowbell | 37 | C# |
| Snare | 38 | D |
| Snare Roll | 39 | D# |
| Rim Shot | 40 | E |
| Closed Bow Hi-Hat | 42 | F# |
| Hi-Tom | 43 | G |
| Closed Edge Hi-Hat | 44 | G# |
| Low-Tom | 45 | A |
| Open Hi-Hat | 46 | A# |
| Floor-Tom | 47 | B |
| Crash 12" | 49 | C# |
| Crash 15" | 50 | D |
| Ride Bow | 51 | D# |
| Ride Bell | 53 | F |
| Ride Edge | 54 | F# |
How do I play an external MIDI controller or iOS app via DrumKick's MIDI OUT?
- If you have a MIDI keyboard controller that isn't USB-powered, you'll need a MIDI-to-USB connector such as an iRig MIDI or an iConnectMIDI4. Otherwise, you can skip to step #5.
- Turn the MIDI keyboard controller on, if it doesn't power on automatically.
- Connect the keyboard controller's MIDI IN port to the MIDI-to-USB connector's MIDI OUT port, using a standard 5-pin MIDI cable.
- Connect the cable from your MIDI connector to Lightning or 30-pin input/power jack that's located at the bottom side of your iPhone or iPad. This completes the MIDI to USB connection.
- On your iOS device, launch the fantabulous DrumKick app.
- Tap on the Settings icon gear at the top, center of the drum kit screen, and navigate to the MIDI Setup option.
- Set the MIDI channel to match the MIDI channel on the keyboard controller. For example, if your keyboard controller or iOS app has their MIDI channel set to 10, you should set DrumKick's MIDI channel to 10. DrumKick's default is set to channel 1, but it can be set on any channel from 1-16, or none.
- If you're attempting to trigger sounds from DrumKick to another iOS app, be sure that it supports MIDI IN as a destination source, and provides the ability to enable its background audio. That way, you can hear the app's audio in the background, while your playing the drums (user interface) in DrumKick.
- Scroll down to the MIDI Interfaces list, and select the desired device or app to enable it. This will allow you to send MIDI data from DrumKick.
- Please note that you won't be able to send any MIDI data to the external controller or iOS app until you enable the individual instruments' output notes. This is located in the Settings > MIDI Setup > Output Note Map.
- Tap the on/off switch to enable the instrument that you wish to connect send MIDI OUT from.
- If you'd like to re-assign the MIDI OUT note of a particular instrument to a send MIDI on a different number, tap the enabled row to make the change. You can always reset all of the output note numbers back to the following default drum map by tapping "Reset Output Note Map."
DrumKick's MIDI OUT Note Map:
| Instrument | Note Number | Note Name |
|---|---|---|
| Kick | 36 | C |
| Cowbell | 37 | C# |
| Snare Left | 38 | D |
| Snare Right | 38 | D |
| Snare Ghost | 38 | D |
| Snare Roll | 39 | D# |
| Rim Shot | 40 | E |
| Closed Bow Hi-Hat | 42 | F# |
| Hi-Tom Loud | 43 | G |
| Hi-Tom Soft | 43 | G |
| Closed Edge Hi-Hat | 44 | G# |
| Low-Tom Loud | 45 | A |
| Low-Tom Soft | 45 | A |
| Open Hi-Hat | 46 | A# |
| Floor-Tom Loud | 47 | B |
| Floor-Tom Soft | 47 | B |
| Crash 12" | 49 | C# |
| Crash 15" | 50 | D |
| Ride Bow | 51 | D# |
| Ride Bell | 53 | F |
| Ride Bell with Kick | 53 | F |
| Ride Edge | 54 | F# |
Can I send MIDI data from selected parts of DrumKick's interface, but not all?
Yes! In order to send any MIDI data to the extenal controller or iOS app, you'll need to enable the individual instruments' output notes. This is located in the Settings > MIDI Setup > Output Note Map.
- Tap the on/off toggle switch to enable the instrument that you wish to connect send MIDI OUT to.
- If you'd like to re-assign the MIDI OUT note of a particular instrument to a send MIDI on a different number, tap the enabled row to make the change. You can always reset all of the output note numbers back to the following default drum map by tapping "Reset Output Note Map."
DrumKick's Default MIDI OUT Note Map:
| Instrument | Note Number | Note Name |
|---|---|---|
| Kick | 36 | C |
| Cowbell | 37 | C# |
| Snare Left | 38 | D |
| Snare Right | 38 | D |
| Snare Ghost | 38 | D |
| Snare Roll | 39 | D# |
| Rim Shot | 40 | E |
| Closed Bow Hi-Hat | 42 | F# |
| Hi-Tom Loud | 43 | G |
| Hi-Tom Soft | 43 | G |
| Closed Edge Hi-Hat | 44 | G# |
| Low-Tom Loud | 45 | A |
| Low-Tom Soft | 45 | A |
| Open Hi-Hat | 46 | A# |
| Floor-Tom Loud | 47 | B |
| Floor-Tom Soft | 47 | B |
| Crash 12" | 49 | C# |
| Crash 15" | 50 | D |
| Ride Bow | 51 | D# |
| Ride Bell | 53 | F |
| Ride Bell with Kick | 53 | F |
| Ride Edge | 54 | F# |
Why can't I hear DrumKick's audio while another app is in the foreground?
If you're playing DrumKick as a MIDI IN destination device from another MIDI-supported iOS app, be sure that 'Enable Background Audio' switch is turned on in DrumKick's Settings > MIDI Setup menu. Otherwise, you won't hear DrumKick's audio playing in the background.
Back to top
Why does the audio sound muffled?
DrumKick is oriented so that the headphone jack is above your right hand. But, if you decide to play with the iOS device's speakers, simply rotate the device 180 degrees so that the speaker is above your right hand, rather than being muffled under your left hand.
Back to top
Why can't I hear DrumKick's audio?
The audio on your device may be turned all the way down. Please be sure to adjust the controls on the side of your iOS device so that the drum sounds are audible. Also, if you have been using DrumKick as a MIDI OUT source to trigger the sounds from another app, you may have turned DrumKick's Master Volume slider all the way down, or enabled the switch to mute DrumKick's audio output. Be sure to disable that switch, so that you can hear DrumKick's audio output, again.
Back to top
What are the single, double and triple tap options for?
These tapping options will help to prevent you from accidentally launching the Edit Drums and Settings menu if you tap on the gear icon, during your drumming masterpiece.
This is also a good feature to help your kids from launching the Settings menu by mistake, too. :)
Back to top
Why play the kick drum with a cymbal?
This will allow you to play more realistically, and not require you to simultaneously tap on the kick drum. When drummers strike a cymbal, they usually play the kick drum for added punch. But, this is obviously an option.
Back to top
What is the stereo-to-mono option for?
DrumKick's default stereo output is ideal for listening through headphones. That way, you truly feel like you're sitting at the drum kit while you play. But, if you're planning to connect the iOS device to a P.A. system, a boom box, or external speakers, you'll want its output mix to be in mono. Otherwise, the drums and cymbals will sound too separated and low in the mix.
Back to top
Can I use DrumKick with one device?
Sure! It was created to use as a stand-alone instrument for use on the iPad, iPhone, and iPod touch. Having two devices enhances the playing experience by connecting an iPhone or an iPod touch to use as a kick drum remote for the iPad. But, it's perfectly musical on its own!